Dienstag, 12. September 2023

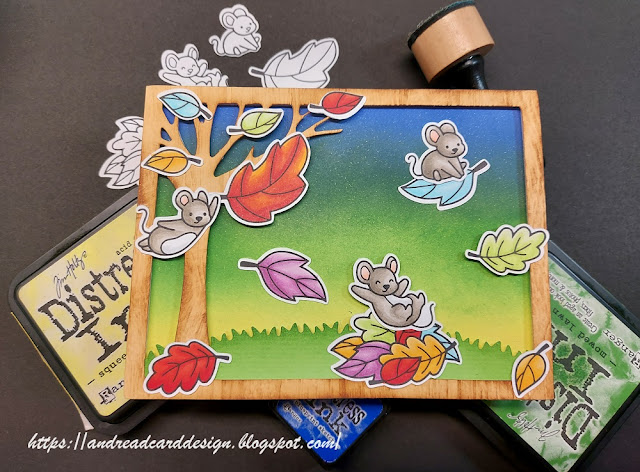
Herbstliche Karte / Autumn card

Hallo Ihr Lieben

Heute möchte ich euch die Karte für die Lawn Fawnatic Challenge #156 "color inspiration" zeigen.

https://www.lawnfawnatics.com/challenges/lawn-fawnatics-challenge-156-color-inspiration

Als erstes habe ich mir meinen Rahmen mit dem Baum aus beigem Tonkarton ausgestanzt. Den Rahmen prägte ich mit dem 3D Embossing Folder, damit ich die Holz Struktur ins Papier bekam. Mit einem Blending Brush und meinen Distress inks einfärben. Den Rahmen dann mal zur Seite legen. 

Weiter gings mit dem Hintergrund. Im Netz habe ich nach einer Farbkombi für einen herbstlichen Himmel gegoogelt. Am Schluss hat mir die Distress Ink Combi von Kristina Werner am besten gefallen.

https://www.kwernerdesign.com/blog/distress-oxide-ink-blending-color-combinations-2/

Den Hintergrund Panel habe ich aus einem Stück weissen Tonkarton zurechtgeschnitten und dann mit den Distress inks und dem Blending Tool eingefärbt. Den Hintergrund habe ich auch zur Seite gelegt.

Weiter ging es mit den Stempel Motiven. Diese habe ich alle auf ein Copic Marker freundliches Papier gestempelt und dann mit meinen Copic Markern ausgemalt. Vorher habe ich mir die passenden Farbkombis zur Challenge herausgesucht. Nachdem alles coloriert war, habe ich die Motive ausgestanzt und alles mal auf dem Hintergrund Panel arrangiert. Irgendwas fehlte meiner Meinung aber noch. Daher habe ich mir etwas grünen Tonkarton geschnappt und mit meiner Grass Stanzschablone einen Hügel ausgestanzt. Dann mit dem passenden Distress Ink Pad eingefärbt. 

Nun konnte alles zusammengesetzt werden. Den Hügel habe ich direkt mit Leim hinter den Rahmen geklebt. Das Ganze habe ich dann mithilfe von Schaumstoff Klebeband auf dem Hintergrund platziert. Nun noch die Motive aufgebracht, teils mit Leim und teils mit Schaumstoff Klebeband.

Das Ganze habe ich dann auf einen weissen Kartenrohling aufgebracht. Fertig ist die Karte.

Liebe Grüsse
Andrea


Hello dear ones.

Today I would like to show you the card for the Lawn Fawnatic Challenge #156 "color inspiration".

https://www.lawnfawnatics.com/challenges/lawn-fawnatics-challenge-156-color-inspiration

The first thing I did was to die cut my frame with the tree from light brown cardstock. I embossed the frame with the 3D Embossing Folder so that I could get the wood grain into the paper. Color with a blending brush and my Distress inks. Then put the frame aside.

We continued with the background. I googled the net for a color combination for an autumnal sky. In the end, I liked the Distress Ink Combo by Kristina Werner best.

https://www.kwernerdesign.com/blog/distress-oxide-ink-blending-color-combinations-2/

I cut the background panel out of a piece of white cardstock and then colored it with the distress inks and the blending tool. I also put the background aside.

Now I stamped all the images needed. I stamped them all on a Copic Marker-friendly paper and then colored them with my Copic Markers. Before that, I picked out the right color combinations for the challenge. After everything was colored, I die cut them all out and arranged everything on the background panel. But something was still missing in my opinion. That's why I grabbed some light green cardstock and die cut out a grassy hillside. Then dyed with the matching Distress Ink Pad.

Now everything could be put together. I glued the hill directly behind the frame with glue. Then I placed the whole thing on the background with the help of foam tape. Now the images are applied, partly with glue and partly with foam tape.

The hole panel was glued to a white card base. Now the card is ready.

Greetings
Andrea


Produkte / prducts

Stempel / stamps

  • You Autumn Know -Lawn Fawn 

Stanzformen / dies

  • You Automn  Know Lawn Cuts - Lawn Fawn
  • Leafy Tree Backdrop, Landscape - Lawn Fawn
  • Grossy Knoll Die - Hello Bluebird Stamps

Prägeschablone / Embossing Folder

  • Lumber 3D Embossing Folder - Sizzix / Tim Holtz
     

Stempelkissen / ink pads

  • Distress Ink Pad Vintage Photo - Ranger / Tim Holtz
  • Distress Ink Pad Squeezed Lemonade - Ranger / Tim Holtz
  • Distress Ink Pad Mowed Lawn - Ranger / Tim Holtz
  • Distress Ink Pad Blueprint Sketch - Ranger / Tim Holtz
  • Memento Tuxedo Black - Tsukineko

Papier / paper

  • Kopierpapier A4 Hochweiss glatt 200g/m2 / copy paper stark white smooth 200g/m2 - ColorCopy
  • Tonkarton weiss, beige und hellgrün/ cardstock white, light brown and light green 220g/m2 - Folia
  • Kartenrohling weiss  / Cardbase white  - Artoz Papier AG

Copic Marker

  • R17, R27,  R29, R30, R02
  • C1, C9
  • W1, W3, W5
  • YR21, Y17, Y38
  • V01, V05, V06
  • B000, B00, B01
  • G20, YG01, YG03
     

Sonstiges / others

  • Papier Kleber / paper glue - Rayher
  • Schaumstoff Klebeband 5mm x 10 m x 3mm / Foam Tape 5mm x 10m x 3mm - Heffy Doodle
Dienstag, 5. September 2023

Weihnachtskarten mit CZ Design Stempel / Christmas card with CZ Design stamp

Hallo zusammen

Heute zeige ich euch zwei Weihnachtskarten, welche ich zu der Simon Says Stamp Wednesday Challenge " Anything Goes" mit CZ Design Produkten gemacht habe.

https://www.simonsaysstampblog.com/wednesdaychallenge/simon-says-anything-goes-109/

Für die erste Karte habe ich mir den Schriftzug auf weissen Tonkarton gestempelt und diesen dann mit meinen Copic Markern ausgemalt. Für das gewisse etwas habe ich mir die rote Glitter Wasserfarbe geschnappt und habe eine Schicht davon über den Schriftzug gemalt. Während dem alles am Trocknen war habe ich mir einen weissen Tonkartonpanel genommen und mit schwarzer metallic Wasserfarbe Spritzer darauf verteilt. Auch dies habe ich zur Seite gelegt, um es trocknen zu lassen.

Weiter ging es mit meinen Glöckchen Stanzen. Die vordere Lage und die Schnüre habe ich mir aus goldenem Spiegelkarton ausgestanzt. Die hintere Lage der Glöckchen habe ich aus schwarzem Tonkarton ausgestanzt und auf diese die goldene Lage der Glöckchen geklebt.

Den Text habe ich mir mit einer Schere ausgeschnitten, dabei habe ich einen schmalen Rand stehen lassen.
Nun habe ich alles auf dem weissen Panel platziert, ausgerichtet und dann aufgeklebt. Aus rotem Tonkarton habe ich mir noch die Schleifchen für die Glöckchen ausgestanzt und dann aufgeklebt.

Das Ganze habe ich mir dann auf einen roten Kartenrohling geklebt. Erste Karte fertig.

Für die zweite Karte habe ich mir wieder einen weissen Copic freundlichen Kartenpanel genommen. Darauf habe ich die Glocken und den Text gestempelt und mit meinen Copic Markern ausgemalt.

Die Glocke und den grossen Schriftzug habe ich auf Maskier Papier gestempelt und ausgeschnitten. Diese habe ich dann auf meinen ausgemalten Motiven platziert. Nun konnte ich mit Distress Ink und einem Blender Brush etwas Farbe für den Hintergrund auftragen. Mit meinen metallic Wasserfarben in schwarz und gold habe ich noch Spritzer auf dem Panel verteilt. Nachdem alles getrocknet war, habe ich das Maskier Papier entfernt.
Den Panel habe ich dann zugeschnitten und mit einem golden schimmernden Tonpapier gemattet. Das Ganze habe ich auf einen roten Kartenrohling geklebt. Fertig war die zweite Karte.

 Liebe Grüsse
Andrea


Hello everyone.

Today I'm going to show you two Christmas cards that I made for the Simon Says Stamp Wednesday Challenge "Anything Goes" with CZ Design products.

https://www.simonsaysstampblog.com/wednesdaychallenge/simon-says-anything-goes-109/

For the first card, I stamped the lettering on white cardboard and then colored it with my Copic markers. For that certain something, I grabbed the red glitter watercolor and painted a layer of it over the lettering. While everything was drying, I took a white cardboard panel and sprinkled it with black metallic watercolor. Again, I put this aside to let it dry.

Now I continued with my bell punches. I punched out the front layer and the cords from golden mirror cardboard. I punched out the back layer of the bells from black cardboard and glued the golden layer of the bells to it.

I cut out the text with scissors, leaving a narrow margin. Now I placed everything on the white panel, aligned it and then glued it on. I punched out the bows for the bells from red cardboard and then glued them on.

I then glued the whole thing to a red card base. First card ready.

For the second card I took a white Copic friendly card panel again. I stamped the bells and the text on it and colored it with my Copic markers.

I stamped the bell and the large lettering on masking paper and cut them out. I then placed them on my colored images. Now I was able to apply some paint for the background with Distress Ink and a Blender Brush. With my metallic watercolors in black and gold, I still spread splashes on the panel. After everything dried, I removed the masking paper. I then cut the panel and matted it with a golden shimmering card stock. I glued the whole thing to a red card base. The second card was ready.

Best wishes
Andrea


Produkte / prducts

Stempel / stamps

  • Good Cheer - Simon Says Stamp / CZ Design
  • Christmas Blessings - Crafter's Companion
     

Stanzformen / dies

  • More Holiday Decorations - Spellbinders

Stempelkissen / ink pads

  • Distress Ink Pad Tumbled Glass - Ranger / Tim Holtz
  • Memento Tuxedo Black - Tsukineko

Metallic Wasserfarben / metallic watercolors

  • Metallic Aquarellfarben Leuchtgold Art / metallic watercolors Leuchtgold Art - Velazquez ( Bea Verlag)
  • rote glitter Wasserfarbe Amore / red glitter watercolor Amore - MM Watercolors

Papier / paper

  • Kopierpapier A4 Hochweiss glatt 200g/m2 / copy paper stark white smooth 200g/m2 - ColorCopy
  • Tonkarton weiss, schwarz, rot / cardstock white, black, red 220g/m2 - Folia
  • Kartenrohling rot DIN A6 / Cardbase red DIN A6 - Artoz Papier AG
  • schimmernder Tonkarton gold / shimmery card stock gold - Artoz Papier AG

Copic Marker

  • R24, R29, R39, R89
  • Y11, Y15, Y26, E27
     

Sonstiges / others

  • Papier Kleber / paper glue - Rayher